
Presented by HOYECHI.
Hand a child a drawing of the front yard and three paper deer, and one of those deer may end up on the roof. Leave it there for the first sketch. There is time to discuss gravity later.
Planning a Christmas display can be a lovely little family project before the boxes come out of storage. Children get a say in something they will see every evening, and the grown-ups get to try a few arrangements without moving a half-assembled deer across the lawn. You only need scrap paper, pencils, scissors, and a tape measure. A flattened cereal box makes a handy drawing board.
The aim is simple: decide where a small reindeer family will look good, leave the everyday paths clear, and give everyone a job they can actually do.
Start with the view your family will see
Look out of your front window together. What is in the way? A shrub that seems small when you stand beside it can hide a fawn from inside the house. The porch railing might cut across a deer’s head. Draw the things that matter: the steps, path, driveway, a couple of shrubs, and the spot where the decorations could stand.
This does not need to be an accurate map. A younger child can draw recognizable shapes; an older one might enjoy measuring the lawn and drawing it on squared paper. Color the route from the sidewalk to the door. That strip stays open for people, deliveries, and whoever has to take the bins out on a dark morning.
Ask everyone to choose one viewing spot. Perhaps one child cares about the view from the sofa and another wants the deer to greet visitors at the gate. Those are useful preferences to discover before anyone has put a stake in the ground.
Make a paper family before arranging the real one
Cut out three deer shapes: a tall one with antlers, a medium one, and a small one. Simple outlines work perfectly well. Fold a little tab at each one’s feet so it can stand on the paper map. Take turns moving the family around, then lower your eyes to table height. Can you still see the smallest deer?
Try placing the tallest figure slightly behind the others, with the fawn forward and off to one side. Then try a loose curve. There is no prize for symmetry. The useful question is whether each silhouette is visible from the viewing spot you chose.
If you are choosing a new set, compare the individual heights, body dimensions, and power requirements of the light up deer in HOYECHI’s Christmas reindeer collection. A photo tells you about the look; the measurements tell you whether the family will fit beside your actual front steps.
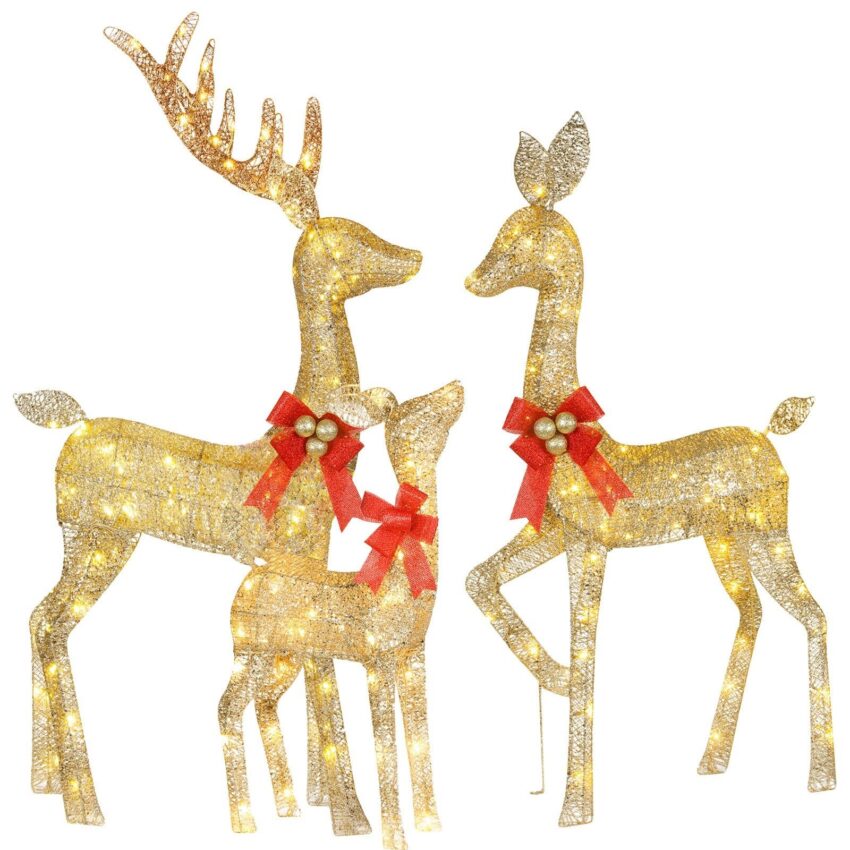
The HYC008 family has three different heights, giving you several ways to arrange the group. Product image courtesy of HOYECHI.
Turn the measurements into something children can picture
A number on a screen can be surprisingly hard to imagine on a lawn. As a worked example, HOYECHI’s HYC008 gold family has a 54-inch buck, a 47-inch doe, and a 29-inch fawn. The 4.5-foot measurement refers to the tallest deer, not all three. The set has 210 warm-white LEDs in total and uses plug-in power.
Let an adult hold a tape measure up beside a familiar doorway so everyone can see what 54 inches looks like. Older children can work out that the buck is 25 inches taller than the fawn. Younger ones can simply put the paper deer in height order. Stop while it is still fun; this does not need to become a worksheet.
Next, measure the space on the ground. The example buck is 26.5 inches long and 11 inches wide. The doe is 28 by 11 inches, and the fawn is 17 by 6.5 inches. Those are the figures’ dimensions, not a ready-made layout: leave additional room between them and for the anchoring arrangement described in the instructions.
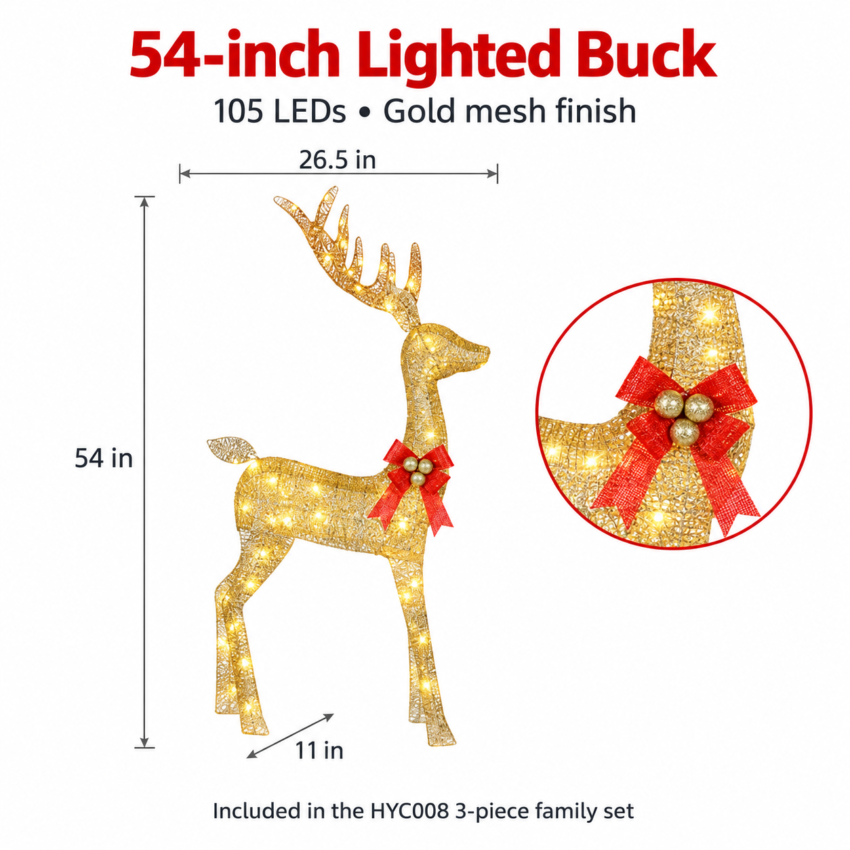
Use each figure’s measurements when planning the space. This buck is one part of the three-piece set. Product image courtesy of HOYECHI.
Take the paper plan outside before assembly
On a dry, calm day, briefly lay out pieces of cardboard to represent the deer. Have an adult stay with the markers, and collect them when you finish. Visit your two main viewing spots. A child’s report of “I can only see two” is more helpful than a vague suggestion to make it prettier.
Move one marker at a time. If the fawn disappears, try shifting it sideways before bringing it farther forward. If the group looks crowded, turn the whole arrangement slightly. A small change of angle may solve the problem without needing a larger patch of lawn.
Also walk the usual routes: door to driveway, gate to porch, and anywhere a stroller or rubbish bin needs to pass. Keep the display and its cables out of those routes. A layout that only works when nobody uses the front door needs another sketch.
Save the grown-up jobs for the grown-ups
Children can be the map keeper, the silhouette spotter, or the photographer. Adults should handle assembly, stakes, ties, cords, and electrical connections, following the instructions supplied with the actual set. Check the product’s outdoor-use guidance and the ratings of any accessories; a photograph of a display is not installation guidance.
At dusk, check the arrangement again from the window. Notice whether the antlers blend into a bare shrub and whether the smallest deer is still easy to pick out. If anything needs moving, disconnect the power first and let an adult make the adjustment. You can decide whether the porch needs another decoration after seeing what the deer already add.
Leave yourself a note for next December
Once everyone is happy, take a picture from the main viewing spot. Write the arrangement on the back of the paper map, including anything you would change next year. Keep it with the instructions when the decorations are packed away, following the set’s storage guidance.
And let someone name the fawn. A penciled note explaining why the little deer is called Pancake may be the part of this afternoon the family remembers longest.