Homeschooling gives families the freedom to turn everyday interests into meaningful lessons. Books and worksheets are useful, but children often understand ideas better when they can create something with their own hands. Machine embroidery can combine art, math, technology, and practical life skills in one enjoyable activity.
By choosing age-appropriate machine embroidery designs, students can plan a project, select colors, measure fabric, and watch a digital pattern become a finished item. The activity feels creative, but it also teaches children how to follow directions, solve problems, and work carefully.
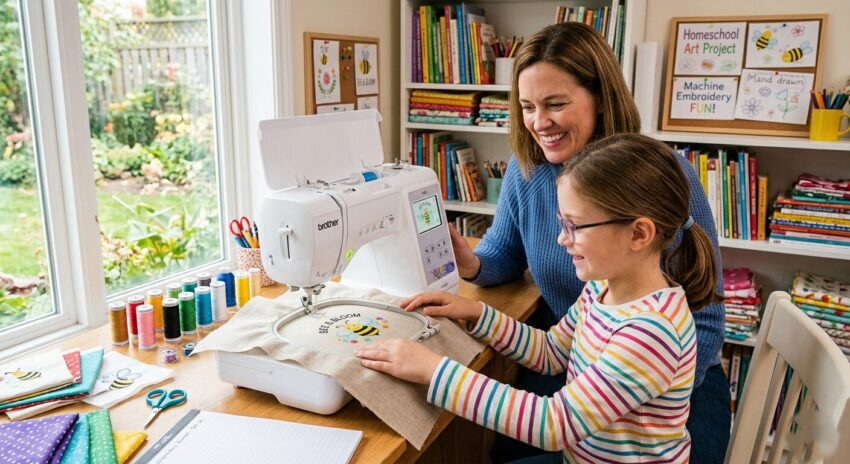
Machine embroidery may look complicated at first, yet it can be introduced one step at a time. Younger children can help with safe preparation tasks, while older students can learn to use the machine with close adult supervision.
Why Machine Embroidery Works for Homeschooling
One embroidery project can support several subjects. Students practice reading instructions, measuring fabric, selecting colors, using technology, organizing materials, correcting mistakes, and finishing what they start. Unlike a worksheet, the lesson ends with an item they can use, display, or give as a gift.
Start With Safety and Machine Basics
Before beginning, explain that an embroidery machine is a tool, not a toy. Show the child the needle, presser foot, hoop, embroidery arm, bobbin area, thread path, and control screen.
Set a few clear rules:
- Keep fingers away from the needle
- Stop the machine before making adjustments
- Keep long hair and loose-fitting clothing clear of all moving components.
- Ask an adult before changing the needle or bobbin
- Never pull or force the hoop
Young children should handle only safe preparation tasks. Older students may use the controls while an adult stays nearby.
Choose an Easy First Project
A beginner project should be small and simple. Avoid designs with many color changes or a high stitch count because they may take too long.
Good first projects include:
- Fabric bookmarks
- Monogrammed towels
- Felt ornaments
- Simple patches
- Decorative fabric squares
- Small drawstring bags
Begin with one or two colors and test the design on scrap fabric. A practice run allows mistakes without wasting the final material.
Turn the Project Into a Math Lesson
Machine embroidery includes many natural math skills. Students need to measure fabric, check the design size, and decide where the embroidery should be placed.
Ask the child to measure the fabric’s width and height. They can find the center by dividing each measurement in half. Older students can compare the design dimensions with the hoop size to confirm that it will fit.
They can also estimate stitching time, measure spaces, or calculate supply costs. These tasks show how math is used outside a textbook.
Explore Art Through Color and Placement
Choosing thread colors creates an easy art lesson. Discuss warm and cool colors, contrast, matching shades, and how thread looks against different fabrics.
Have the student sketch a few color combinations and compare centered or corner placement. Let them experiment so they can see how fabric and thread affect the result.
Connect Embroidery With History
Embroidery has decorated clothing, linens, and ceremonial items for centuries. Select a specific country or historical period and explore its distinctive materials, color palettes, and design patterns. Students can make an inspired project and write a short paragraph about what they learned.
This helps connect the craft to history, geography, writing, and art. It also shows children that embroidery has been both practical and meaningful in many cultures.
Teach Planning With a Checklist
Planning is part of the lesson. A simple checklist may include:
- Choose the design
- Check its finished size
- Select fabric and thread
- Add the correct stabilizer
- Prepare the bobbin
- Hoop the fabric
- Load and position the design
- Complete a safety check
- Start stitching
- Trim threads and finish the item
A checklist builds independence and shows that good results begin with preparation.
Let Children Help Solve Problems
Thread may break, fabric may shift, or a color may look wrong. These are normal learning moments.
Instead of fixing everything immediately, ask:
- What do you notice?
- Which step should we check?
- Is the fabric still tight?
- What could we change next time?
Children learn more when they help find the solution. Adults should still handle repairs involving the needle or moving machine parts.
Mistakes should not be treated as failures. A test piece that does not turn out perfectly can teach students about fabric, stabilizer, thread tension, or design placement.
Keep a Project Journal
After each project, have the student record the materials, colors, problems, and lessons learned. Add a photo or fabric sample so the journal becomes a record of growing skills.
Students can also give each project a name and write one or two sentences about its purpose. This adds a simple writing activity without making the project feel like another long assignment.
Create Useful Projects
Children may feel more motivated when their work has a purpose. Instead of making only practice samples, look for projects they can use in daily life.
They could decorate a towel for the kitchen, make a bookmark for reading time, personalize a bag, or create an ornament for a holiday. Students can also make small gifts for relatives, friends, or neighbors.
Creating something for someone else gives the lesson greater purpose and significance. It encourages children to think about the recipient’s favorite colors, interests, and needs.
Conclusion
Machine embroidery can turn a homeschool day into a lesson that combines creativity and practical learning. Children can practice math, art, technology, history, planning, and problem-solving through one activity.
Start with a simple project and give each child tasks that fit their age. The goal is not perfect stitching. The real value comes from learning how to prepare, follow steps, solve problems, and finish something with care.
Frequently Asked Questions
What age can children begin machine embroidery?
Young children can choose colors and prepare materials. Older children, often around age eight or above, may use simple controls with close adult supervision.
What supplies are needed?
You will need an embroidery machine, fabric, stabilizer, embroidery and bobbin thread, scissors, a hoop, and a compatible design file.
How long should a lesson last?
A beginner lesson can last 30 to 60 minutes. Younger children may need shorter sessions, especially during their first few projects.
Can this count as a homeschool subject?
Yes. Depending on the project, it can support art, math, technology, history, home economics, and practical life skills.