Homeschooling has taken off in a big way. More families are realizing that learning doesn’t have to happen inside a traditional classroom. But if you’ve ever tried homeschooling at the kitchen table or in a busy living room, you know how quickly distractions pile up.
Kids need structure, and you need space. That’s where a shipping container classroom can transform your home learning experience. It’s affordable, private, and surprisingly fun to create.
Why a Shipping Container Makes a Great Classroom
Shipping containers are strong, weatherproof, and ready to modify. They give you a clean slate to design exactly the kind of learning space your family needs. Unlike adding a new room to your home, a container classroom doesn’t require months of construction. You can place it right on your property and customize it step by step.
The best part is the cost. A 20ft used container is often half the price of building an addition. If you choose a newer container, it will already look sharp and last for decades with minimal maintenance. You also get flexibility. If your family moves or your needs change, you can relocate the container or repurpose it into an office or guest studio later.
And there’s an environmental bonus. Turning a retired shipping container into a learning space keeps it out of the scrap yard and reduces construction waste. It’s recycling on a big, meaningful scale.
Planning Your Container Classroom
Start by deciding how much space you’ll need. A 20ft container works well for one or two students and a cozy teaching zone. If you have multiple kids or want separate learning areas, go for a 40ft cargo container.
Next, think about placement. You’ll want it close enough to the house for convenience but far enough for peace and quiet. Flat ground and good drainage are important. If your yard isn’t level, a few concrete blocks or a gravel pad can do the trick.
Before delivery day, check with your local building department. Some areas require permits or have zoning rules about detached structures. It’s always better to know what’s allowed before modifying the container.
Designing a Comfortable and Inspiring Interior
Once the container is in place, it’s time to transform the steel box into a bright, inviting classroom. Start with insulation. Spray foam or insulated panels will keep the space warm in winter and cool in summer. You can finish the walls with drywall, beadboard, or even wood paneling for a cozy look.
Add an air conditioner or portable heater for temperature control. Then think about lighting. Containers can feel dark if you don’t add enough windows. Installing a few windows or a glass door brings in natural light, which helps kids stay alert and cheerful during study time.
Inside, organize the space with purpose. One wall can hold a whiteboard, corkboard, or smart screen. Another can have built-in shelves for books, craft bins, and school supplies. Use sturdy modular desks or tables that can rearrange easily. Add a reading corner with beanbags or floor cushions where your kids can relax between lessons.
Choose flooring that’s easy to clean, like vinyl plank or laminate. A colorful area rug adds warmth and a sense of home.
Power, Connectivity, and Tech Setup
Shipping containers can be wired just like any small building. Run electrical lines for outlets, lights, and computers. You can also bring internet through an underground cable, a Wi-Fi extender, or even satellite service if you are in a more rural area.
If you’re going for an eco-friendly approach, consider adding solar panels on the roof. Many families love the idea of a self-powered classroom that teaches sustainability in action. Pair the panels with a small battery system to store extra energy for evening lessons or cloudy days.
Creative Décor for an Inspiring Space
Once the basics are done, you can have fun decorating. The container may start as a plain metal box, but inside it should feel alive and inspiring.
Paint the walls in calming colors like light blue, sage, or soft yellow. Use peel-and-stick decals with encouraging quotes or world maps. Hang string lights or magnetic strips for artwork and projects.
Add a few plants in the corners to freshen the air and make the space more welcoming. Kids can help care for them as part of science lessons. You might even paint the outside of the container to match your home or give it a cheerful classroom look with bright trim.
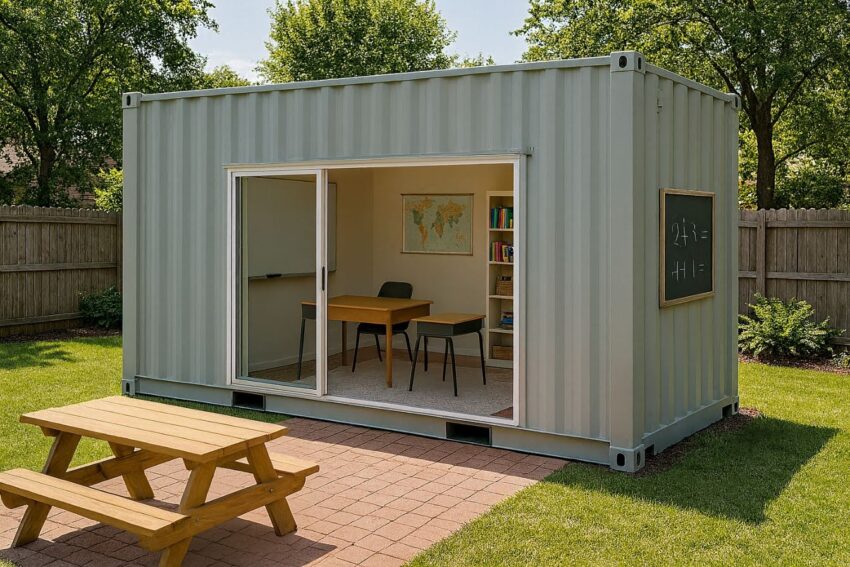
Outdoor Learning and Play Areas
One advantage of using a container is that you can create an entire learning zone around it. The space beside the container can become an outdoor classroom or art area.
Add a picnic table for science experiments or lunch breaks. Paint a chalkboard on the exterior wall for math drills or creative drawing. Set up small garden beds so your children can grow vegetables or flowers while learning about biology and responsibility.
These outdoor zones make homeschooling more interactive and give kids a reason to get fresh air between lessons. On warm days, you might even move the whole classroom outside under a canopy.
Safety and Comfort First
Before moving in, take care of safety details. Make sure there’s good ventilation so the space doesn’t get stuffy. Install a proper exit door and at least one window that can open. Use non-toxic paints, adhesives, and flooring materials.
Check for moisture buildup during the first few weeks and use a small dehumidifier if needed. Add security locks or cameras if you live in an open area.
These small details make your classroom not just creative, but truly safe and long-lasting.
Real-Life Inspiration
Families across the country have turned containers into learning pods that reflect their children’s interests. Some have turned one half into a library with built-in bookshelves and the other into a science lab with lab tables and storage bins. Others use the container as a flexible hybrid space that shifts between art studio and study hall.
One family even painted the outside of their container with a mural of planets and stars. Inside, they used glow-in-the-dark stickers and a small telescope by the window. Their kids learned astronomy right from their backyard.
Your setup can be as simple or elaborate as you like. That’s the beauty of the project. You get to design a learning space that fits your family’s rhythm, creativity, and goals.
Bringing It All Together
Turning a shipping container into a homeschool classroom is more than a DIY project. It’s an opportunity to rethink how and where your kids learn. Instead of clearing off the dining table every morning, you can walk out to a dedicated classroom that feels special, focused, and full of potential.
You’ll save money compared to major home renovations, and you’ll end up with a flexible structure that can evolve with your family. Today it’s a homeschool classroom. Tomorrow it might be an art studio, a home office, or a quiet retreat for reading and reflection.
With a little imagination, insulation, and creativity, you can turn a simple shipping container into one of the most inspiring rooms your family will ever use. It’s your own backyard schoolhouse ready to spark curiosity, learning, and memories every single day.